Banners
| Related Videos | |
|---|---|
|
Part 3 of Creating Tables in Q (Video) |
| Related Online Training modules | |
|---|---|
| Combining Questions | |
| Nesting Questions | |
| Generally it is best to access online training from within Q by selecting Help > Online Training |
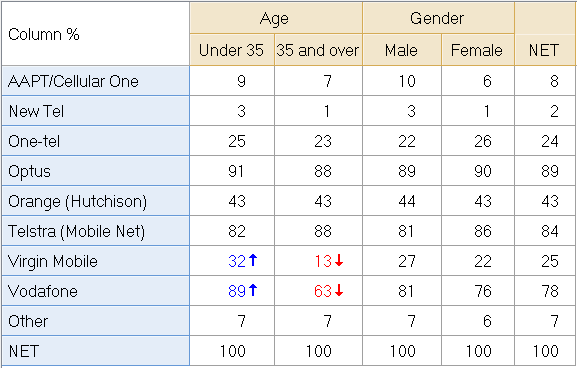
It can be useful to combine multiple questions together so they can be selected simultaneously, as shown below. This is done by selecting Create > Banner > Drag and Drop and dragging the questions of interest from the left to the right of the dialog box. Where questions are placed side-by-side, they will appear side-by-side in the resulting banner question. If placed on top of each other, Q will nest the questions (e.g., create a category of Males aged 18 to 24). Once a banner has been created it can be selected for use in other tables from the Blue and Brown Drop-down Menus. It will also appear as a question in the Variables and Questions tab.
From Q5, banners may also be constructed by writing code to specify which respondents should be included in each column. This is done by selecting Create > Banner > Code. For information on how to write the appropriate code, see Construct Logic Variable.
A key difference between Q and other programs
In most programs, banners are created as a part of a table. That is, you create a table and specify the columns and rows of that table. In Q, by contrast, when a banner is created, it becomes a new Question that can be re-used on other tables and operates in largely the same way as other questions in the database. In particular, if you modify a banner on one table, all other tables using that banner will update to reflect the change.
Creating Banners
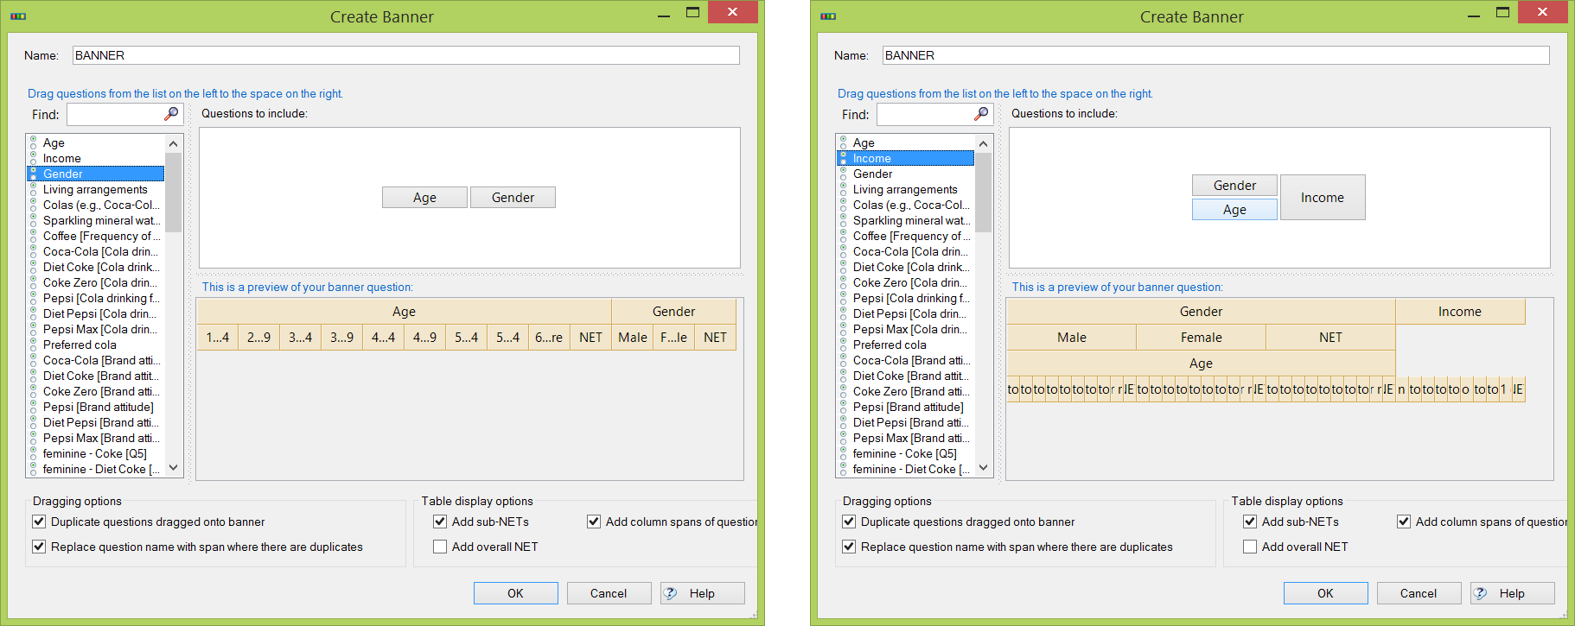
When you select Create > Banner > Drag and Drop, you go to the Create Banner dialog box. Banners are created by dragging from the list of questions and variables onto the white area named Questions to include. The position of the data on Questions to include determines whether data is nested or not. The example on the left creates a banner with Age and Gender next to each other. The second example shows Age nested within Gender, with Income to the right, as shown on the table below.
Buttons, Options and Fields
Name Name for the question to be created.
Questions to include Drag questions from the list on the left onto this field to create a banner question.
Add sub-NETs When checked, the NET of each question is also included in the banner.
Add overall NET When checked, a single NET is added to the end of the banner, representing the combination of all of the questions' categories. An alternative is to add a Total (see Editing a banner by modifying a table).
Duplicate questions dragged onto banner When a question or variable is dragged into Questions to include a new question is automatically created in the Variables and Questions tab. This new question stores any modifications you make within the banner (e.g., merging of categories or modifications to the Value Attributes. If Duplicate questions dragged onto banner is not ticked, a new question is not created, and any changes made in the banner will also be applied to other uses of the question in the project.
Replace question name with span where there are duplicates Q does not permit multiple questions to have the same name. Consequently, when a question is dragged onto the banner and duplicated, the new question is automatically created with a unique name. For example, the duplicate of Age will be called Age 2. However, usually people will prefer to have the original name appear. Consequently, when Replace question name with span where there are duplicates is selected, Q automatically hides the name of the question and instead creates a new span using the original question name.
Add column spans of question names This causes the name of the question, or, where there are duplicates (see the comments above for Replace question name with span where there are duplicates), the name of the original question, to appear as a span, as shown on the example to the right.
Editing a banner in the Edit Banner dialog box
You can right-click on a banner as it appears on a table and select Edit Banner, which causes a dialog box to appear which is the same as the Create Banner dialog boxes illustrated above. This dialog box is most useful for reorganizing banners, such as adding questions, or changing any nesting.
Editing a banner by modifying a table
Modifying questions
Once a banner has been created, each of the questions within the banner are modified in the usual ways. For example:
- Drag-and-drop to merge categories.
- Right-click on categories and select Values to modify their Value Attributes.
Adding a total
Right-click on the banner and select Add Total Category to create a total on the banner. Note that this total will include the entire sample (i.e., it is not a NET).
Adding categories to a banner
Where there is a desire to add an extra question to a banner, the most straightforward way is by right-clicking and using Edit Banner. However, it is also possible to right-click on any of the categories in the banner and select Add Category - Logic, which allows you to create a Logic Variable with a simple expression, either by selecting an individual category from a variable, or, using simple expressions such as as Q2 = [65 or more] AND Q3 = [Male], or, Q5(1) OR Q6(1-4).
By right-clicking and selecting Add variable you can simultaneously create other types of variables and have them included in a banner.
Spans
A span is Q's term for groups of categories (e.g., Male, Female and Income in the example below). You can modify and create Spans on banners in the usual ways (see Spans for more information).
You can also automatically place spans above questions by having right-clicking and selecting Show question name as span.
Significance testing
When using Column Comparisons, significance testing in a banner is determined by the spans, with tests being conducted within a span. You can also right-click on a category within a span and select Comparisons to get more fine-tuned control within the span.
With Date questions, the Date questions setting in Statistical Assumptions controls whether the tests are compared with the rest of the data (the defaults), or, Compare to previous period. Where appropriate, this setting will apply across spans. In the example below, the arrows for Coke Zero - When 'out and about' for Jul-Sep 12 and 45 or more means that this age group had a significantly higher score than in the previous time period of Apr-Jun 12.
Dynamic updating
When a project is updated using File > Data Sets > Update, the banner itself will automatically update to reflect changes in the underling data and data structures. In the example shown above, when a new data file is used which contains an additional quarter of data, the new column is automatically added to the banner in the appropriate place and all the significance tests are automatically updated.
Further reading: Data Analysis Software


